Tag: travel tips

  • Travel Tips: International Travel With Kids

    Travel Tips: International Travel With Kids

    Passports, visas and immunizations are important considerations when traveling internationally with children.  The U.S. Department of State has a helpful tool that allows visitors to find passport, visa and immunization requirements for specific destinations.  It is necessary to plan in advance to make sure that you have everything taken care of before your trip.

    Passports for Kids

    It used to be possible for U.S. citizens to travel to a number of countries with only their birth certificate or for minors to travel on their parent’s passport when flying abroad, but this is no longer possible.  U.S. citizens can generally only travel within the U.S., to U.S. territories, to Canada or Mexico in limited circumstances or on certain closed loop cruises without a passport.

    All U.S. citizen children traveling out of the country by air must have a valid passport that complies with the requirements of their destination and where necessary, a visa. Note that many countries require not only a valid passport at the time of entry but also for the duration of your stay or some time period afterwards.  It is recommended that your passport will not expire for at least six months after your intended stay.  When applying for a new passport, you should aim for it to arrive at least several weeks before traveling.

    The U.S. Department of State publishes current processing times for passport applications. In our experience, children’s passports usually come more quickly than predicted, but you do not want to take the risk of not having your passport in time for travel.  Expedited processing is available at an additional fee.

    The passport application for children under 16 requires completed forms (available online in form filler and PDF formats), original/certified U.S. citizenship evidence (e.g. birth certificate), a photocopy for application, proof of parental relationship (e.g. birth certificate), form of identification for parents and photocopy for application, appropriate photograph of the applicant and the required fees. Make sure that you have completed (but unsigned) forms, all documentation, pictures and required copies before you go to the post office or library that you have confirmed processes passports.

    If you plan to apply for a passport for your child as soon as possible after birth, you need to inform the hospital to expedite the birth certificate. Birth certificates can take a long time to process, and even with expedited status and multiple phone calls, my daughter’s took 30 days to be issued.  My husband got certified copies on the day the birth certificate was issued, and we applied for her passport the next day so that we could travel to Mexico before the end of my 12 week maternity leave.

    If completing the forms and collecting the documentation was not enough of a hurdle, passport photos can also be a bit of a hurdle, especially for a baby. You can get passport photos at Costco, Walgreens, FedEx and even some Post Offices. The picture needs to comply with stringent guidelines. Check the picture yourself before going to the Post Office.  We once had a professional picture rejected and had to run to the closest CVS to the post office to have it retaken before submitting the application.

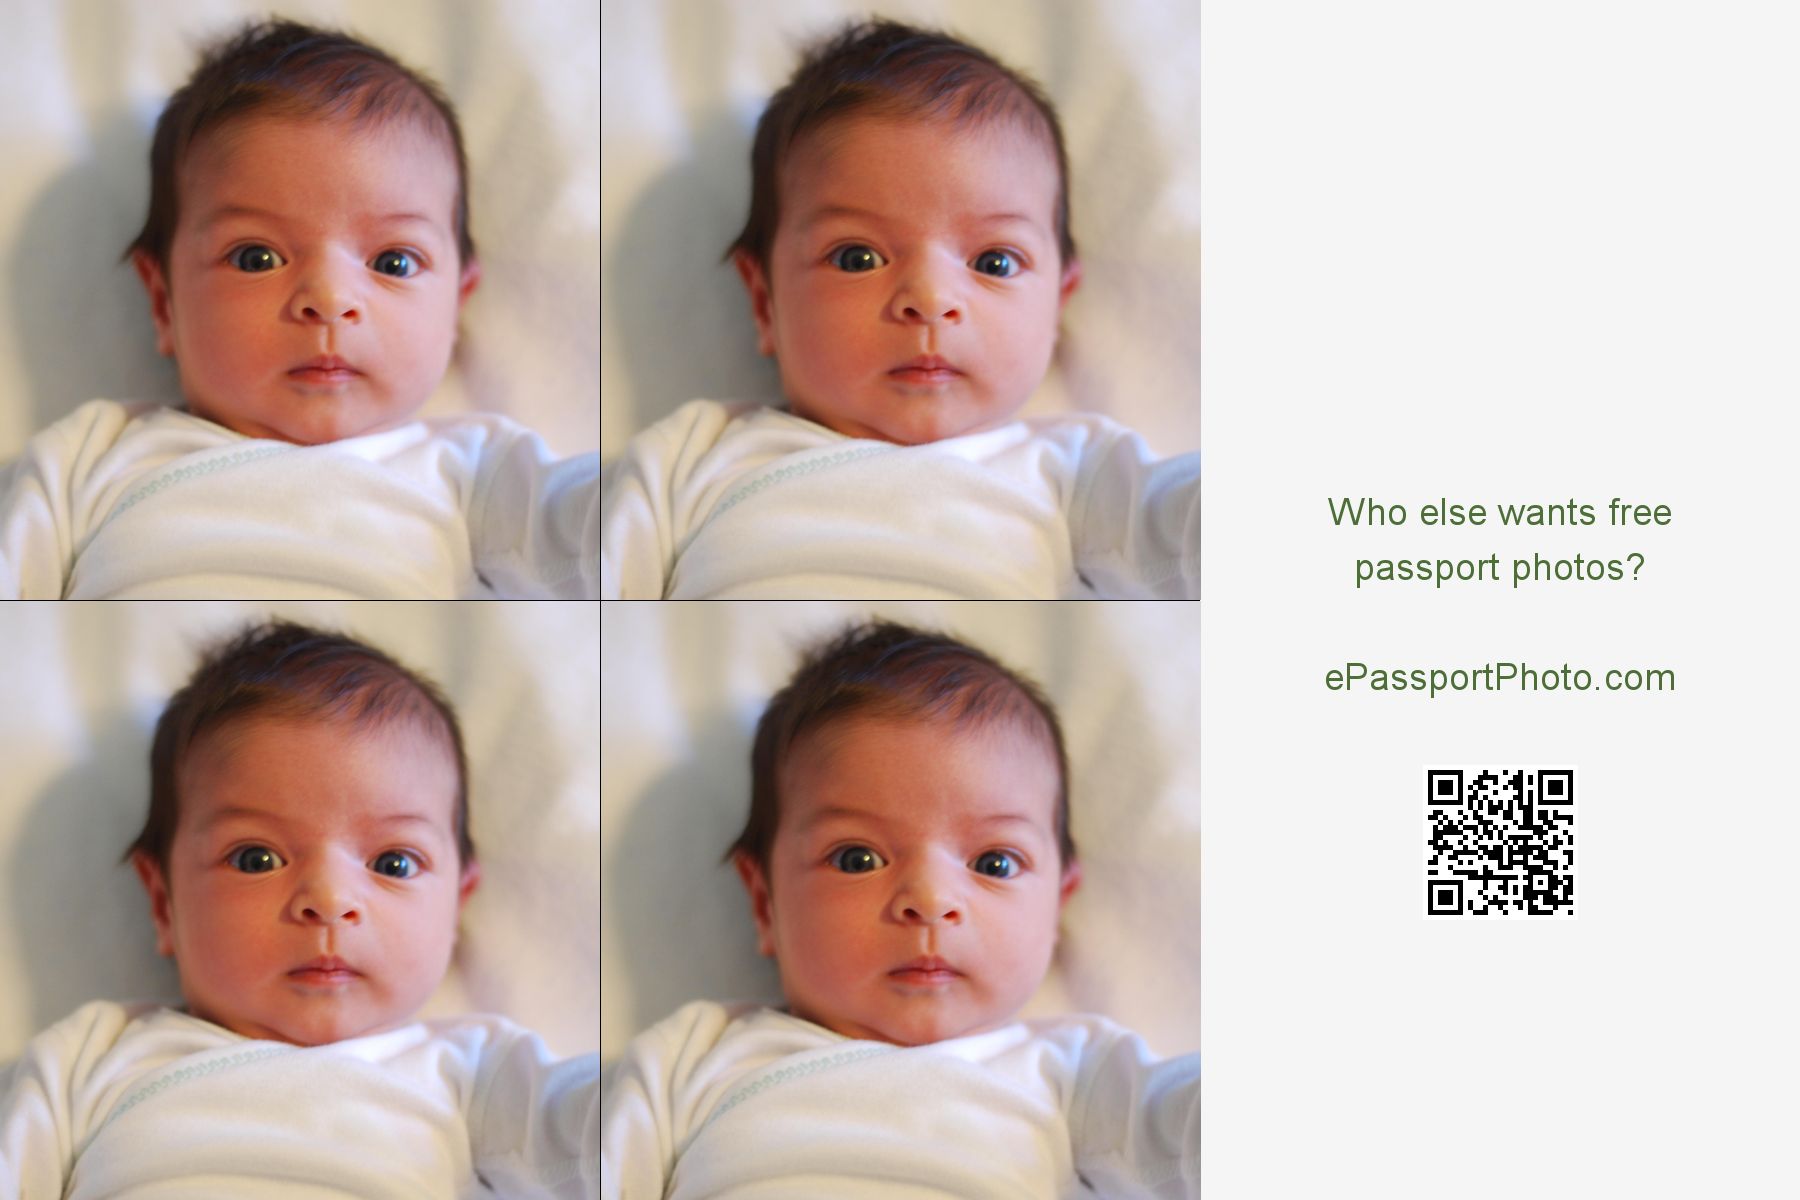
    Because all of our children have traveled abroad before five months, they have needed passport photos at very young ages. While there is some leniency with infants’ photos, it can be extremely challenging to wake an infant to have a professional photo taken.  After several failed attempts to get a professional picture of my daughter who was only a few weeks old, I took the picture myself with her sitting on a bouncy seat covered in a white sheet and then edited the picture using epassportphoto.com to make sure it complied with the size guidelines.  I took over 100 shots and even enlisted the help of a visiting friend, but the resulting picture had my newborn daughter’s eyes open and looking at the camera, printing at Target cost me $.20 and the outtakes were fun.

    To apply for a child’s passport, both parents and the child must go to the post office together with all completed forms (available online), required documentation and two copies of the child’s passport photo. Many post offices post the times that they handle passport applications.  These times are likely during mid-day during the week, and we have found that information on the website may not be correct, but it is also very challenging or not possible to call in advance to verify.  It’s ideal if you can go to the Post Office and verify passport application hours before you are actually near any sort of deadline, but we are typically not that organized.

    The good news about passports is that they are valid for five years of unlimited international travel for children under 16 and for ten years for all applicants over 16.

    Visas for Kids

    If a visa is required for your destination, you need to inquire into specific visa rules and the various lengths of validity. Typically, the longer the duration of validity, the more expensive the visa.  We traveled on 60-day e-tourist visas for India but had to apply during a specific window and complete final processing at the Bangalore Airport upon arrival.  It was a bit of an added hassle to our middle of the night arrival, but far less expensive than the one-year visa.  This option made sense for us because we did not expect a return trip in the near future.

    While visas add an extra paperwork and fees into international travel plans to certain destinations, it is far easier for US citizens to obtain visas to visit other countries than it is for non-US citizens to get visas to travel to the US.

    Immunizations for Kids

    In addition to identifying required immunizations by destination, the Center for Disease Control suggests necessary immunizations and travel considerations. Your pediatrician may be able to administer these immunizations.  We have found that our insurance generally covers the cost of non-standard immunizations such as Hepatitis A and typhoid, but it is important to call and inquire as soon as you know your travel plans because these immunizations might not be regularly stocked.  Our pediatrician was willing to write required prescriptions for our India trip but had only one dose of the typhoid vaccine available and was unable to secure additional dosages for our other children. We were glad we asked, but it is still necessary to visit a travel doctor for prescriptions and immunizations before travel.  There are not a lot of options in our area and most have very limited hours, so you have to schedule an appointment well in advance of your travel, if needed.

    Additional Considerations for International Travel With Kids

    It is important to travel with photocopies of passports and visas for your entire family.  If one ever goes missing, at least you will have your information.  If a child is traveling internationally with only one parent, the traveling parent needs to bring a copy of a Minor Travel Consent Letter signed by the non-traveling parent.

    When traveling abroad with kids, it’s important to find the best travel products that work for your family, including strollers, carriers, car seats and baby monitors.

    While paperwork is never fun, I promise it will be worth it when you get to your international destination!

    Check out our other Travel Tips for advice about traveling with kids.
  • Travel Tips: Traveling with Kids and Car Seats

    When traveling with kids car seats are a necessary evil – you have to keep your kids safe when coming and going, but they’re heavy and cumbersome and aren’t always the most pleasant thing to try and install after a long day of travel.

    Full disclosure: I am a bit of a car seat junkie and have always erred on the side of caution. My 8 year old can legally ride in the car without a car seat now, but he still rides in a high back car seat in our vehicles, and if given the choice, I always have him ride in a backless booster when carpooling or in grandparents’ vehicles. As a bone fide car seat junkie, however, I have now taken numerous taxi rides and plane trips with / without car seats and can share what has worked for us and what hasn’t.

    Will I need a car seat at my destination?

    The obvious first question is — do we need a car seat at our destination? There are many variables to consider:

    • Will you be doing a lot of travel by car? While a car seat may be critical for a trip to Los Angeles, it is less necessary and likely superfluous for a trip to New York City.
    • Can you rent/borrow a car seat? Most rental car companies give you the option of renting a car seat.  I have friends who have had awful experiences, but also friends who have had wonderful experiences. We rented a car seat once – for a 24 hour layover in Munich – and had a perfectly acceptable experience.  We also recently had neighbors who had family visiting from the UK and needed two car seats – happily, we were able to loan them our spare car seats during the duration of their trip.
    • Do you have alternative options? For a solo trip to LA where I needed a high back booster, I decided to just purchase a car seat and have it shipped to my mother. My brother installed it prior to picking us up from the airport and we happily left the car seat with them for future trips. This is an option to consider if you will be flying somewhere to visit family and plan on making frequent return trips.

    How will we get to/from the airport/train station?

    The second question we always have to answer is how we are getting to/from the airport or train station. When my son was 8 months old and we were flying to Orlando where we did not need a car seat, I opted to walk to/from the metro station with my son and metro to the airport in lieu of riding in a taxi cab with him unrestrained. I did the return walk to/from the metro station with him in a stroller on the trip home from the airport. Eighteen months later, when the same son was 2.5  years old and we were making a similar trip, I decided to just let him ride in the back of the taxi cab instead of making the trek to/from the airport via metro. Why? Because he was older and I felt safer riding in the backseat with him, versus a still relatively floppy infant who couldn’t be restrained at all. The fact that the airport is less than 5 miles from our house with a speed limit of no more than 40 miles per hour also informs that decision.  So, part of “how will we get to/from the airport/train station?” also involves “how much risk am I willing to take?” While legally, children in our state can ride unrestrained in a “for hire” vehicle, each parent needs to decide what they are comfortable with given their unique circumstances. Given the option, if we are bringing a car seat, I prefer to install the seat in the cab/uber because safety is almost the most important!

    What car seat do I need?

    Everyone’s favorite question when it comes to young kids – what gear do I need? The age/weight of your child dictates what gear you need and, of course, as the kids get older, the more options you have!

    Infant Car Seat:

    There is no replacement for the infant “bucket” car seat. We have owned two Chicco Keyfit 30’s and have been happy with them. Although it is one of the heavier bucket seats on the market, it didn’t really bother me much as both my kids outgrew them in terms of comfort well before we started seriously traveling with them by plane. Moreover, I loved the ease of the keyfit stroller caddy, which made it possible for me to transport sleeping babes to and from just about anywhere, providing me with a few precious additional minutes of peace and quiet!

    three weeks old and napping by the ocean in St. John’s Island, South Carolina while mom and dad enjoy a relaxing lunch

    The Convertible Car seat:

    The convertible car seat is the most difficult car seat to travel with, in large part because it’s so heavy and cumbersome and, during the age your child is in the convertible, there’s very little by way of “other” options. For both kids, we used the Britax Marathon and simply took them with us everywhere. We would install them using the LATCH mechanism on taxis/cabs, set them up in the airplane seat (if needed), and then install at our destination.

    rear-facing install on an airplane, prior to second birthday

    Although there are accessories you can purchase that are designed to alleviate the burden of hand carrying the car seat, we never used them. My husband simply tightened the car seat straps and carried them over his shoulder. If needed, he would double bag it in a black trash bag before checking it, but for the most part, we simply gate checked it and had no problems retrieving it on the other end of our trip. Both my sons loved the familiarity of having their same car seat on our trips and we never worried about the quality or condition of a rental company car seat.

    The Harness Booster:

    At some point, your child may outgrow the convertible car seat and you may decide that you’re not quite ready for your child to ride in a backless booster. I fell squarely in this camp and purchased a Graco Nautilus which is what my older son has been riding in for the past four years (since he was 4 years old)! The nice thing about these car seats is that they grow with the child. You can keep them in a five point restraint, then adjust to a high back booster + lap belt, before adjusting to a backless booster + lap belt. Unfortunately, the high back booster set up of this car seat is the opposite of built for travel as the back is not attached to the base (they simply click together), so there’s no way of carrying this car seat without it coming apart. I believe we took one trip with this car seat and quickly swore never again – it was large and cumbersome and extremely difficult to keep together. This was also definitely a car seat we had to check at the curb – there was no way we could have carried it with us to the gate without completely losing our minds.

    The Ride Safer Travel Vest:

    photo credit

    The “travel vest” was purchased immediately prior to a trip to NYC where we would be traveling by train – AMTRAK and Subway. I didn’t want to lug around a car seat with us, yet didn’t quite feel comfortable letting my 4 year old ride around in a taxi or friend’s car without some kind of restraint. A friend suggested the travel vest and it turned out to be a lifesaver! The seat comes in a little bag that is easy to carry and is extremely light and not-bulky. It can be tossed into a large carry on, or, you can even have your child wear it as a backpack.

    the ridesafer vest can easily be worn as a backpack

    Although it takes a few minutes to line the car seat belts into the appropriate buckles, we used this car seat on numerous trips where we didn’t plan to travel extensively in a vehicle, but wanted a safe option for car travel on the occasion we were in a vehicle. As an extra bonus, this car seat ended up being an easy solution for carpool and fitting three children across the backseat of my car, on the occasion when I needed to take a classmate of my older son somewhere, but my toddler’s convertible car seat prohibited me from squeezing in an extra backless booster.

    Note that this car seat comes in two different sizes and because it did end up being so useful for carpool, we purchased the bigger size to accommodate our son and his friends for carpool purposes in first and second grade – before they were old enough that I felt safe – both personally and legally – to allow them to ride without a car seat.

    Backless Boosters, the mifold, and the Bumble Bum:

    Although car seat safety guidelines vary by state, in our state, children who are 4 AND 40 pounds can legally ride in a backless booster. There was much rejoicing on our first trip with a backless booster because it not only meant we didn’t have to carry around a giant car seat, but also because it meant our son likely could carry his own booster! We have a basic Graco booster seat  that we reserve for travel and carpool purchases. It is cheap, relatively small, and does what it’s intended to do – lift up my kid so that the seat belt is properly positioned on his body.

    photo credit

    In addition to the regular booster, we also have a mifold, which does the opposite of the regular booster seat – it brings the seat belt down to the child so that it is properly positioned on their body. Although we have not traveled – yet – with the mifold, I have loved the flexibility it has provided us in terms of fitting a third child between two existing LATCH car seats. And, it’s an easy thing to have tucked away in the trunk in case the need arises.

    photo credit

    Another option to consider in the category of backless boosters is the BubbleBum:

    photo credit

    Although my family has not used the bubblebum, I know Catherine’s did on a recent trip to Iceland and aside from having to reinflate it a few times a day, it worked perfectly and was a good, lightweight option for her older two children.  Another family who recommends the BubbleBum used it for their six year old during their family gap year.

    The IMMI GO:

    A car seat that I have yet to try is the IMMI GO.

    photo credit

    I heard about the IMMI GO a few years ago when UBER FAMILY came out, but never had occasion to try it. A friend of mine, however, mentioned that it was actually available for purchase and so we purchased one just prior to our last vacation. Unfortunately, because it arrived just the day before our scheduled departure, I didn’t feel comfortable using it without getting a chance to try it out. My son was just barely within the weight range for it and so, I decided to save it for our next trip. Although I haven’t had a chance to test it out yet, I can safely say, I find its small size to be impressive and look forward to using it on our next trip!

    Per the website, the IMMI GO is:

    Designed and tested for children:

    Height: 31” – 52”

    Weight:  22 – 55lbs.

    Airline Seat Restraints:

    Children don’t legally need a special seat restraint when flying, but as a parent, I know I agonized about whether it was safe for my young children to fly without a restraint. For that reason, prior to age two, we frequently carried on our son’s convertible car seat and strapped it into his airline seat. However, that quickly became undesirable because it took up a lot of space width wise and also because when upset, my son would kick the back of the seat in front of him and there was nothing we could do about it given the extra “lift” the seat gave him. As a result, we ended up purchasing a CARES harness for flights.

    CARES Harness:

    The CARES harness is designed for airline travel. It slides over the top of the child’s seat and provides an extra restraint across your child’s chest. The airplane seat belt is slipped into loops on the harness, which goes across your child’s lap. Although not essential, I did find this extra restraint to be comforting to have on turbulent flights.

    strapped into his CARES harness and ready to go!
  • Japan With Kids (Part VII): What I Wish I Knew

    Japan With Kids (Part VII): What I Wish I Knew

    I have mixed feelings about our trip to Japan, in large part because of how surprisingly difficult it was to get information beforehand and how difficult it was to get around. We underestimated just how difficult “getting around” would be – from reading the subway maps/signs, to locating specific addresses, to finding restaurants that would accommodate us with our son. Having traveled to Asian countries before, I was surprised to find the lack of children in Tokyo and the hostility towards children, since most Asian countries are full of kids and tend to welcome kids with open arms.

    That said, some of the blame is likely entirely our fault as this was the first international trip we took with our son. Although we had traveled with him extensively throughout the United States prior to this trip, we likely over shot in terms of making this around-the-world trip our first International trip with kids. Nevertheless, I loved loved loved our time in Japan and can’t wait to go back. If I could do it differently, though, I would:

    • hire a local travel guide, or make more heavy use of the concierge at the hotel to identify restaurants
    • send my husband out to scope out restaurants before venturing out with our son. On a few occasions, my husband did go out and scope out locations while we were resting or napping in the afternoon and that helped significantly in terms of confirming locations and ensuring that they would allow children to dine
    • not underestimate how important it would be to make prior reservations for better dining establishments. Many of the better rated or better reviewed restaurants are small (think 4-8 tables) and turn over maybe twice during one meal, so it’s imperative that you have prior reservations if you plan to dine
    • spend more time in Kyoto. Although we never ran out of things to do in Tokyo, it was definitely too overwhelming a place to be with a little kid. In Kyoto, children seemed more welcome, and there was lots more we could have done/seen that would not have involved what seemed like endless walking on city streets
    trying to figure out the Japanese bus ticket machine

    In terms of getting around, we had a much easier time getting around in Tokyo once we got our bearings. We eventually figured out how to purchase train tickets and the stops were labeled in English so we were able to pinpoint, generally, where we wanted to go. Once we got to our general location, however, it was still sometimes overwhelming in terms of how much walking we had to do to actually locate our destination. The walking became a problem only because we had a 4 year old with us, BUT, to his credit, we easily put 4-7 miles on those legs every single day, and he managed and did it without any major issues.

    One of the nicest things about Japan was that everyone was extremely helpful and assisted in making sure that commuters got where they wanted to go. For example, our shuttle stop had an attendant with a loud speaker who would call over the bus and make sure that people who wanted to get back to the hotel got on the correct bus. This was an amazing perk and something that we saw quite a bit of throughout Tokyo.

    bus attendant

    If you have the opportunity to travel to Japan, I highly recommend it. A more off-the-beaten-path location like Okinawa or Kyoto is likely to be a better destination with kids, especially younger children. If you happen to be planning a trip in the Spring, aim for the cherry blossom season! Hopefully you get lucky like we did and hit them at peak bloom.

  • Travel Tips: Flying With Kids

    Travel Tips: Flying With Kids

    When traveling with children, it is important to arrive at the airport early because getting to your plane will take longer than it would if you were traveling without children.  For families traveling with lap children under age two, make sure to go to the check-in desk upon arrival to inquire whether the flight is full.  There is no fee to make this request, but also no guarantee that the seat will stay open.  Nonetheless, many times, we were moved to a row where we could take advantage of an empty seat, and gate attendants often blocked a seat in the system or even assigned it to us so no one would take it when there were sufficient extra seats on a flight.  After I knew what to expect, flying with kids was so much easier.

    Car Seats for Kids

    There are few instances where it makes sense to bring a car seat on board. You have to weigh the difficulty of getting the car seat to the gate against the potential benefit of having the car seat onboard.  If you are guaranteed or likely to receive a vacant seat for your infant, and their infant seat locks into your stroller, it might be worthwhile.  The car seat will have to be installed at window seat because there is no access around it.  Many children sleep better in a car seat than in their parents’ lap.  We have done this a few times because it always “seems like” a good idea, but basically, my babies usually prefer sitting with Mom or Dad, and it is a struggle to get the seat to the plane and then also to figure out a way to fit the seat into the overhead compartment to take advantage of the empty seat.

    A car seat might be useful for a child under two and a half who is in a paid seat. If you have purchased a seat for your infant or toddler, you are likely going to want to take advantage of it, but a child under two and a half may have trouble sitting in their own seat with a belt during takeoff and landing.  We have not traveled with a child between ages two and two and a half, but flight attendants have double and triple checked on my petite children when flying in a required paid seat under aged three.

    Strollers for Kids

    We rarely check strollers during the check-in process because we find the stroller extremely useful in getting to the gate. It can be a long walk, and a stroller can also serve as a partial luggage cart to store a few backpacks and jackets underneath. I often tuck my baby carrier in a convenient spot and pull it out if our baby gets fussy or we determine it is more effective to use the stroller as a full-fledged luggage cart after relinquishing ours before security.

    TSA PreCheck for Kids

    We do not have TSA PreCheck but understand it is a great perk.  Going through security with kids can be a bit of adventure. Luckily, most airports shepherd us to the family/express line.  In addition to the usual TSA rules, strollers need to be collapsed and run through the x-ray machine.  It’s helpful to put your shoes in the first bin, and take the baby out of the stroller only after you have placed all other items on the belt and taken your shoes off, if necessary.  If you have a non-walker with you, an adult can carry the child through the metal detector, but the child generally has to be removed from a carrier or sling.  Walking toddlers are encouraged to walk through on their own, but I have been told many times that it is also fine to carry one of mine through.

    My husband and I often have a brief strategy session where we identify who is responsible for which items and even assign specific items to our boys to collect. After your items come through the x-ray, open the stroller and put your baby in first before gathering the rest of your items.

    Play Areas for Kids

    Play areas are becoming more popular in airports. Our favorite was in Doha, Qatar, which had a massive indoor playground and also smaller satellite playgrounds on different concourses.  My 20-month old daughter who had learned to walk at the end of the previous summer was finally steady enough to climb up a slide on her own.  So, she had her first independent playground/slide experience in Doha’s airport.

    Pittsburgh International Airport also has a play area sponsored by the city’s amazing Children’s Museum of Pittsburgh. Our kids had a blast in this interactive area.  I chuckled when I noticed that it was clear that a parent had actually not designed the space that had several full and half walls obscuring the view from the stadium seating created for parents.

    Play Area at Pittsburgh International Airport

    Boston’s Logan International Airport also has Kidport play area that is wonderful for kids and rocking chairs overlooking the planes.

    Kidport at Boston’s Logan International Airport
    Rocking chairs with a view of airplanes

    If you are traveling with a stroller, make sure to check in with the gate attendant and get a tag for gate-checking. Unless directed otherwise, you bring your stroller down the jet way and leave it as you enter the plane.  You may need to wait on the jet way after deplaning for the stroller to arrive.

    In the Airplane With Kids

    We found that traveling with babies was easier than toddlers.  Our babies really liked to be held and cuddle and could get comfortable in our laps.  When traveling with a baby, make sure to nurse or feed the baby a bottle during take off and landing to help prevent ear pressure.

    When flying during a time where it is optimal that your kids to sleep, do everything possible to make sure that they do sleep during the flight. This may require adjusting their bedtimes in the days before you travel.  Once the plane is cruising, you can raise the arm rests and have your child use your legs as a pillow and rub their backs until they fall asleep.  They generally should be able to remain belted while they rest.  We were really lucky when traveling from Boston to Doha because the plane had so many empty seats that my husband and two boys were each able to take a row of three seats for themselves and stretch out overnight while my toddler daughter and I shared the fourth row.

    If sleeping is not an option, I let each of my kids pick a few books and small activities to bring with them. I was really concerned about the 30 hours of transit time between Cleveland and Bangalore, but the in-flight entertainment on Qatar Airlines was so amazing that I generally found that I had over packed “activities” for the flight.  One book, a few Suduko puzzles, a small journal and a deck of cards is usually plenty, especially if you have in-flight entertainment or some shows downloaded on an iPad and necessary earphones.  Other family favorite travel games include picking a category (e.g. food or location) and going through the alphabet in order taking turns naming an item in the category that starts with your letter, e.g. Apple, Banana, Cucumber….

    If you are prepared for your airplane trip with kids, the experience will be smoother for everyone.

    Traveling with kids?  Check out our other Travel Tips, including Preparing to Fly.

  • Travel Tips: Preparing to Fly With Kids

    Travel Tips: Preparing to Fly With Kids

    Most of our trips require airplane travel, which requires research and preparation.  Here are five ways to prepare for a flight with kids:

    #1:  Booking Flights

    Booking flights is the first step in travel planning. Because we now need five air tickets, flight cost is a huge consideration for any vacation.  My husband and I are not loyal to a certain airline, so we have not accumulated useful points on any one airline to use for vacations.  We also have not mastered credit card points like Nancy.  Instead, we look for direct flights that fit our schedule at the lowest possible cost. We have been able to take advantage of some great fares because of our research and willingness to drive from Cleveland to airports in Akron, Pittsburgh and even Toronto airports.

    We are constantly monitoring flight costs to various destinations we would like to visit. While we are often tediously thorough when making purchases of household items (like the time we looked at dining room chairs at more than 20 different stores before we made a purchase), we are able to react quickly, make a decision and book a flight when we find a deal.  Several times, we have booked a flight within tw`o hours of finding it – even if we were not focused on a particular destination, and we regularly mull for less than a few days after we have identified a specific flight.

    There are a wide variety of travel websites, but I favor Google Flights, because it is easy to search the lowest return fares in a calendar view. Also, fares for budget airlines like Spirit Airlines and Frontier Airlines are included, but it is necessary to search Southwest Airlines separately.   We also monitor Travelzoo and once set aside Martin Luther King weekend for a potential trip and then took advantage of a weekend fare sale announced the previous Tuesday to fly to New York City.

    Families flying with a child under age two likely do not have to purchase a separate seat for their infant or toddler, but may need to pay taxes or fees.  Some airlines make it challenging to add a lap child during online booking, and we have had to call the airline directly to have a lap child added to our itinerary.  Some families try to pick a time of day that fits best into their children’s nap schedule. Our kids have never had strict sleeping schedules, and that gives us more timing flexibility.  We try to find direct flights that depart from Cleveland early in the morning and return late at night to optimize our time at our destination and avoiding additional hotel costs needed for an evening arrival or morning flight home.

    We always try to select window and aisle seats. When we needed only four seats, we aimed for two windows and two aisles in the same row.  If the middle seats remain empty, we had the opportunity to spread out.  Extra fees for seat selection are relatively common.  While we never pay this extra fee, we always make sure to check-in online exactly 24 hours before departure.  Websites like Airline Checkins and apps like Airline Flight Check-In World will check passengers in to their flights as soon check-in is available, but I have never personally tried these services.

    #2:  Check Baggage Policies

    Before booking a flight, it is really important to review the airline’s baggage policy. It used to be standard for airlines to permit all passengers to carry on one small suitcase and a personal item and often check one suitcase as well with no fee.  However, a fee for checked luggage is now almost standard, and it is becoming more common for budget airlines to charge for carry on items larger than a backpack.  Domestic airlines continue to allow families to check in or gate check strollers and car seats, but WOW air permits only a free stroller or car seat for children under seven.

    We recently booked a flight to New Orleans for $83 round trip, and the least expensive baggage charge was an additional $42 if the bag was added during booking. That is more than 50% of cost of the seat.  It is important to consider baggage fees when comparing fares and also often necessary to add desired luggage at the time of booking to avoid additional fees.  Cheapflights has a great summary of airline’s baggage allowances and policies regarding children for a quick comparison.

    #3:  Packing

    It’s helpful to use a packing list (like our ultimate packing list) when preparing for any vacation.  For families traveling with a baby who is either nursing or likely to lie on a parent’s lap during the flight, an inflatable travel nursing pillow is very helpful.  It fits easily in carry-on luggage and is easy to inflate after boarding.  Our babies (and our arms) were so much more comfortable when we brought this with us.

    Before you leave for the airport, re-check your airline’s baggage size and weight guidelines and make sure your bags are not too big or too heavy. Although most airlines do allow some wiggle room, it is always safest to know that your luggage will not create an issue.  Make sure that any liquids in a carry on are packed in containers of 3.4 ounces or less and that all liquids fit into one quart-sized re-sealable plastic bag per person.

    Infant and child “nourishments” are exempt from TSA’s normal liquid rules, but make sure to review TSA’s guidelines on traveling with children for rules about formula, breast milk, juice and baby food. Basically, reasonable quantities of formula, breast milk (even for mothers traveling without their babies), juice and baby food typically is permitted through security, but it may be subject to extra security tests.  I was asked once in London almost 10 years ago to “taste” the milk from my son’s bottle, but that is no longer common practice.

    #4:  Identification

    On domestic flights, identification is generally not required for children but is especially important for lap children and older teens who may appear to be over 18. It’s best to have a birth certificate or immunization record to prove the age of any lap children traveling without a passport.  Even though I don’t know if we have ever been asked for proof of age, it is not worth the risk to try to slip a two year old through as a lap child as there is a possibility of needing to purchase a last-minute, full fare ticket for a child.

    #5:  Preparing the Kids

    Especially if we have an early morning flight, it is important that our children know exactly what the “plan” is. I once explained to my boys that we were going to wake them up in the middle of the night and have them change into the clothes hanging on their ends of their beds, brush their teeth, put on shoes and get in the car.  We would then eat breakfast on the way to the airport.  It was going to be dark, and they were going to be tired but could sleep on the plane.  And, by the afternoon, we would be eating lunch at our resort on the Caribbean.  My kids woke up when they heard us getting ready and came to ask if it was time to get dressed and were extra well-behaved throughout the whole journey (which even included an Ebola virus scare), and we did have a lovely lunch in Mexico.

    Proper preparation is a key to a successful vacation with kids.  Check out our other Travel Tips, including Travel Tips:  Airports and Airplanes.

  • Japan Part V: Four Nights in Tokyo With Kids! (where we stayed and what we did)

    Japan Part V: Four Nights in Tokyo With Kids! (where we stayed and what we did)

    From Kyoto, we took the bullet train to Tokyo. My son, of course slept the whole time and has no recollection of the experience – such is traveling with a 4 year old! The cost of the trip was 17,600 Yen per person, or approximately $160 USD. My husband, who spent a summer in Switzerland in college, said the Japanese train system was much like Switzerland – clean as a whistle and punctual. The train ride was smooth, fast, and an hassle free way to travel from Kyoto to Tokyo for the last leg of our journey – 4 nights in Tokyo.

    Where we stayed:

    Hyatt Regency Tokyo (Shinjuku)

    Our 4 nights in Tokyo were spent at the Hyatt Regency Tokyo in Shinjuku. We booked our room using points and requested a slightly larger room than the standard offering. Imagine our surprise when we entered our room and found the nicest hotel room we have stayed in to date! We also received a lovely welcome treat from the hotel and were delighted to learn that our room came with access to the Regency Club, so we had free breakfast and drinks and hors d’oevres before dinner. As if that wasn’t enough, on clear mornings, we could see Mount Fuji from the club room!

    our remarkably spacious bathroom
    the desk/office area
    I loved the partition that separated the sitting area from the bedroom
    the welcome amenity we found awaiting us upon arrival; they refilled the fruit daily
    the pre-dinner spread in the Club one night during our stay

    The hotel also has other amenities we did not get a chance to take advantage of, namely, the pool and the spa. From these photos, however, I sure wish we had snuck in a trip to the pool. The following three photos are from the hotel’s website:

    The absolutely stunning lobby. Not visible in this photo, but there were small storefronts on the outer edges of the lobby, so you could purchase macarons on your way up to your room in the afternoon (and we did this on more than one occasion)!

    What we did:

    Our hotel was conveniently located in Shinjuku. Although many of the travel sites we read said it was a business area, it ended up being centrally located to quite a bit of shopping and entertainment.

    photo credit

    Kabukicho:

    Located just a few blocks away from the hotel was Kabukicho, the entertainment and red light district. Unfortunately for us, it was the first place we wandered to upon arrival in Tokyo and did not leave a great impression on us. We had a difficult time finding restaurants to dine in and were turned away from a number of restaurants when they spotted our son. We also tried to go to the massive arcade they had, but were told no kids after 6pm. In hindsight, I suppose we should have done better research and perhaps it was a blessing in disguise that they did not let us in because who knows what we would have found behind the doors, but it was a jarring experience and unpleasant introduction to Tokyo.

    Nevertheless, we ended up returning to Kabukicho a few times during our time in Tokyo and it was there that my son discovered video games!

    Shinjuku Skyscraper District

    Our hotel was located right in the Shinjuku Skyscraper District, and so we got to see first-hand the sheer number of people who flood into Tokyo every day to work. Our first morning there, I ventured out in search of a laundromat so that our clothes could finally get a good wash. While I was out, my husband and my son went to a park, so that my son could stretch his legs and get some energy out, and they also went to the Tokyo Metropolitan Government Building and took the elevator up to the observatory (admission free). The weather was not great, so reports on the view were less than stellar.

    It took me a while to figure out the machines, but I enjoyed the solitude


    Speaking of playgrounds, we absolutely loved the playgrounds in Tokyo. While there weren’t a lot of children in Tokyo, we did find at least two playgrounds with fantastic climbing equipment. My son, a  natural born climber, loved hiking up the equipment and it was a great opportunity for him to release some energy. Tokyo actually is very similar to San Francisco in that you see very little children in the city. One afternoon, while at the playground, we did see a crowd of school children who had obviously just gotten out of school; but we never saw kids in any of the shopping districts or areas that we were visiting – not even the parks where the cherry blossoms were. We definitely got the sense that the children typically lived outside the city center or played a more “back seat” type role in their parents lives than they do in the US, so that is definitely something to consider when planning a trip to Japan.

    Shinjiku Gyoen Park

    Cherry blossom season begins in January in southern Japan in Okinawa and moves north, peaking in March/April in Kyoto and Tokyo. When we planned our trip, we hoped to hit the cherry blossom trees in peak bloom, but living in DC, we knew there was no guarantee, so we crossed our fingers and hoped for the best.

    Happily for us, we hit the season in full throttle and basically chased the blooms from Kyoto to Tokyo. By the time we reached Tokyo, the cherry trees were in full bloom, and we were fortunate that our hotel was located within walking distance to the Shinjiku Green Park (admission 200 Yen, or ~$2). We absolutely loved walking around the gardens and visited at least twice during our stay.

    Hakuhinkan Toy Shop in Ginza

    We did quite a bit of people watching and window shopping in Tokyo, and Ginza did not disappoint. For a good portion of the afternoon, the main street is closed to traffic, so pedestrians can walk freely and the roads can accommodate the heavy foot traffic. One of our stops was the Hakuhinkan Toy Park in Ginza – a massive multi story toy shop. While there, we discovered and indoor motorized race track, which my son got a kick out of. The store was also fully stocked in Frozen dresses, and I was sad that I didn’t have the foresight to purchase a suitcase full of dresses to bring home! Based on the level of Frozen-insanity going on in the US at the time, I could have financed a good portion of our trip that way!

    Ueno Zoo

    After dragging our son through quite a number of department stores, we decided to spend a morning at the Ueno Zoo so he could stretch his legs and enjoy being a kid! The zoo was a perfectly fine way to spend a few hours, but it was nothing to write home about.

    Ueno Park

    A short walking distance from the zoo is Ueno Park, which we were delighted to discover was in full swing due to the annual cherry blossom festival. There are a number of museums and temples in the area, but we were happy to experience the park, which was hopping in activity. The pathways were lined with people and there was a street food festival going on as well. We spent a few hours just walking around and sampling the different food offerings, while also taking in some of the sights. Curiously, we were one of the very few tourists there – we saw some tourists, but others were there in large groups with pets, blankets, friends… It was clear that the Japanese enjoy spending time outdoors enjoying nature!

    My son had a blast the day we went to Ueno for the Zoo and Park. Getting a break from the constant walking, train riding, and window shopping was good for him, and it gave him an opportunity to just be a kid. He even took part in some of the food sampling and the Park also had carnival like rides for little kids. All in all, it was probably the most kid-friendly and kid-centric activity we did while in Tokyo!

    Asakusa’s Kappabashi

    a typical display of food offerings in a restaurant window

    One of the more random things we stumbled across in Tokyo was Kappabashi, Tokyo’s fake food mecca. Nearly every restaurant in Japan displays fake food, or sampuru, to provide a quick visual of what the restaurant has to offer. Until we stumbled across Kappabashi, we frequently wondered where the fake food came from and how one goes about acquiring the fake food displays for a restaurant.

    Our questions were quickly answered in Kappabashi, where we encountered blocks and blocks of shops containing every single imaginable kitchen/dining item you could imagine.

    fake burgers so good you can *almost* eat them
    we had to take a picture with the stock pot so large, you could cook a four year old in it!


    If you happen to find yourself in the area, definitely wander through and take a look. We ended up coming home with some items which we still use today!

    Continue to Part VI – What We Ate

  • Iceland With Kids: What I Wish I Knew

    Iceland With Kids: What I Wish I Knew

    Our first few hours in Iceland were rough.  Although we read a number of guide books and blogs and asked friends who had traveled with children for advice, we did not find a great resource for families traveling the Ring Road.  Lonely Planet’s Iceland guidebook states, “It may be a good idea to limit yourselves to one part of the island to avoid boredom induced tantrums and frequent bouts of carsickness. Reykjavik is the most child-friendly place simply because it has the greatest variety of attractions and facilities.”  We did not have issues with boredom induced tantrums or motion sickness, and Reykjavik was one of the least exciting destinations for them.  While I believe traveling the Ring Road with children can be an amazing experience, we could have been better prepared for our trip before heading to Iceland with kids.

    We arrived at about 6 a.m. after a six-hour flight. While we had prepared ourselves and the kids for the time change by going to bed and waking up very early in the preceding week and all went to sleep rather quickly on the plane, none of us slept more than six hours. We stepped out of the plane without putting on the fleeces, gloves and hats packed in our backpacks into a cold, damp and windy morning to board our shuttle for the airport.  Herding our luggage to the rental car office was further complicated by our daughter unexpectedly getting sick, twice.

    After completing paperwork and installing the car seats, we plugged our first destination into the GPS to find that it was not identified because our GPS did not have an Icelandic keyboard. GPS coordinates, which we had not recorded, were often necessary.  Also, the helpful Geysir employee who processed our rental warned us that speed limits were strictly enforced by speed camera and police, but when we set out in our car, we found that it was pre-set for miles.

    After heading out of the airport, we decided to pick up something to eat, but the only available option was a convenience store near the airport, which was probably the grocery that was the most expensive with worst selection that we visited in Iceland. It would have been better to eat the protein bars we brought with us, taken a nap in the car and held off shopping until Bonus, Netto or Kronan opened.

    When we visited AAA in preparation for this trip, we found that AAA did not have a map of Iceland or really any helpful tourist information. This was a first for us – we usually rely on AAA to provide backup maps for any road trip.  We hoped to pick up a good map of Iceland at the first visitor’s center we found, but we did not get one until that first evening.  So, we spent that first day in a bit of a sleepy daze and mostly unsure of where exactly we were.

    Early arrival in Iceland after a night of not so great sleep is practically inevitable, and our daughter’s fluke (but luckily short-lived) illness was purely unlucky, but you can substantially ease first day stress by being prepared with your itinerary and all the directions you might need to navigate. If you are using a GPS, try to preset the Icelandic alphabet and kilometers and make sure you have GPS coordinates (which are included here whenever available) pre-programmed and, if possible, a map of the country with you when you arrive.

    It took us a few hours to get organized, but we ended up having a rather astonishing day. From the moment we left the airport, we were in awe of the views we saw along the side of the road.  The purple flowers (Alaskan lupine) growing everywhere were an instant favorite. We made an unscheduled stop at Reykjavik’s first Costco, which had opened only a few weeks earlier, took the Lava Tunnel tour and visited Kerid Crater before stopping for the night.  Our kids were all asleep when we reached our guest house and slept while I made dinner.  When our oldest woke up, he thought he had slept a full night when it was time for dinner.  Despite the late naps and 24 hours of daylight, none of us had trouble sleeping that night (or any other night of our trip, for that matter).

    Want to find out more about Iceland with kids?  Check out our listing of all Iceland posts.

  • Sample Iceland Itineraries With Kids

    Sample Iceland Itineraries With Kids

    After we booked our 10-night trip to Iceland with kids, we were not exactly sure how to divide our time.  I read one guide-book we consulted suggested not to travel the Ring Road with kids because of boredom and carsickness.  Our kids are not prone to either (and certainly loved our Ring Road trip), but I wish we were able to locate suggested Iceland itineraries for families with kids before booking hotels.  Luckily, our guestimated pace worked out great.  My key advice to anyone planning a trip to Iceland for at least three nights is to try to fit in a trip to Jökulsárlón Lake.  I’ve never met an Iceland traveler who wasn’t wowed by this amazing glacial lake.

    Our family spent 10 nights in Iceland and traveled the Ring Road and then ended our trip with 4 nights in Reykjavik that allowed us to take several day trips.  Our itinerary was an extended version of the 9 day trip.  For families planning a trip to Iceland with kids, here are some suggested itineraries to consider:

    Iceland Itinerary 3 Days

    Day 1 – Keflavik Airport and Reykjavik

    • Pre-book at Blue Lagoon in morning to coordinate with your arrival
    • Hallgrímskirkja
    • Shopping in Reykjavik
    • Harpa
    • Baejarins Beztu Pylsur – hot dog stand

    Day 2 – Golden Circle Day (via rental car or pre-booked day tour)

    • Thingvellir National Park
    • Geysir and Strokkur
    • Gullfoss
    • Kerid Crater

    Day 3 – Reykjavik to Airport

    • Shopping in Reykjavik
    • Visit Harbor Area
    • Return to Keflavik Airport

    Iceland Itinerary 4 Days

    Day 1 – Keflavik Airport and Reykjavik

    • Pre-book at Blue Lagoon to coordinate with your arrival
    • Hallgrímskirkja
    • Shopping in Reykjavik
    • Harpa
    • Baejarins Beztu Pylsur – hot dog stand

    Day 3 – Golden Circle Tour (via rental car or pre-booked day tour) Stay in Vik

    • Thingvellir National Park
    • Geysir and Strokkur
    • Gullfoss
    • Kerid Crater
    • Seljalandfoss Waterfall

    Day 3 – Vik to Reykjavik

    • Reynisfjara Beach
    • Dyrhólaey
    • Sólheimajökull Glacier
    • Skogafoss Waterfall
    • Eyjafjallajökull Volcano

    Day 4 – Reykjavik to Airport

    • Shopping in Reykjavik
    • Visit Harbor Area
    • Return to Keflavik Airport

    Iceland Itinerary 5 Days

    Day 1 – Travel from Keflavik Airport to Vík, stay in Vík

    • Seljalandfoss Waterfall
    • Eyjafjallajökull Volcano
    • Skogafoss Waterfall
    • Sólheimajökull Glacier
    • Dyrhólaey

    Day 2 – Travel to Jökulsárlón Lake and back to Vík (many tourists do not travel East of Vík, but you will really be missing out if you do not see Vatnajökull Glacier and Jökulsárlón Lake, which were absolute highlights of our trip).

    • Reynisfjara Beach
    • Vík
    • Fjaðrárgljúfur Canyon
    • Vatnajökull Glacier
    • Jökulsárlón Lake
    • Return to Vík

    Day 3 – Travel from Vík to Golden Circle to Reykjavik

    • Thingvellir National Park
    • Geysir and Strokkur
    • Gullfoss Waterfall
    • Kerið Crater

    Day 4 – Reykjavik

    • Hallgrímskirkja
    • Shopping in Reykjavik
    • Sun Voyager sculpture
    • Harpa
    • Baejarins Beztu Pylsur – hot dog stand

    Day 5

    • Pre-book at Blue Lagoon in morning to coordinate with your departure
    • Return to Keflavik Airport

    Iceland Itinerary 7 Days

    Expand on the 5 Day Trip by extending stays in Reykjavik and Vík adding on whale watching, lava tunnel tour, a day-trip to Snaefellsnes Peninsula, visit to Reykjanes Peninsula and Bridge Between Two Continents in Reykjanes, Laki crater or a show at Harpa. 

    Iceland Itinerary 9 Days 

    Day 1 – Travel from Keflavik Airport to Vík, stay in Vík

    • Seljalandfoss Waterfall
    • Eyjafjallajökull Volcano
    • Skogafoss Waterfall
    • Sólheimajökull Glacier
    • Dyrhólaey

    Day 2 – Travel from Vík to Höfn

    • Reynisfjara Beach
    • Vík
    • Fjaðrárgljúfur Canyon
    • Vatnajökull Glacier
    • Jökulsárlón Lake
    • Höfn

    Day 3 – Travel to Egilsstadir or Eskifjörður

    • Picnic lunch along ocean
    • Spar Crystal Mine (Eskifjörður)

    Day 3 – Travel to Husavík

    • Eskifjörður pool
    • Dettifoss Waterfall

    Day 4 – Husavík Whale Watching and Myvatn

    • Whale watching tour
    • Myvatn Lake area
    • Stay in Myvatn (if you can find accommodation) or in Akureyri (stopping at Godafoss en route)
    • Goðafoss Waterfall

    Day 5 – Akureyri

    • Goðafoss Waterfall
    • Explore Akureyri – shops and Akureyrarkirkja
    • Akureyri Thermal Pool
    • Back up day for whale watching in Dalvík or Husavík in case of inclement weather on Day 4 or Myvatn Lake area if you did not have sufficient time on Day 4

    Day 6 – Travel to Reykjavik

    • Travel to Reykjavik
    • Laudardalslaug Thermal Pool

    Day 7 – Golden Circle

    • Thingvellir National Park
    • Geysir and Strokkur
    • Gullfoss
    • Kerið

    Day 8 – Reykjavik

    • Hallgrímskirkja
    • Shopping in Reykjavik
    • Harpa
    • Baejarins Beztu Pylsur
    • Sun Voyager sculpture

    Day 9 – Airport

    • Blue Lagoon (pre-booking required)
    • Bridge Between Two Continents – Reykjanes

    Iceland Itinerary for a Longer Trip 

    Expand on the 9 Day Trip by extending stays in Reykjavik and Vík adding on whale watching, lava tunnel tour, a day-trip to Snaefellsnes Peninsula, etc. 

    Find Out More about Visiting Iceland With Kids

    Continue to Iceland Part X – What I Wish I Knew or check out our listing of all Iceland with kids posts.

  • Iceland With Kids: Logistics

    Iceland With Kids: Logistics

    Logistics related to travel in Iceland with kids were somewhat more complicated than many other family travel destinations.  Public transportation was not a feasible option for our trip around the Ring Road, and the cost of eating out and availability of restaurants required us to prepare many meals on our own, something we typically do not do on vacation.  This was our first time renting a car in Europe and the most expensive destination we ever visited.  Here are some of the logistical considerations necessary when planning a trip to Iceland.

    Driving in Iceland

    The Ring Road is a two lane highway that was well maintained and clear.  Many side roads are gravel, and we were glad to have a 4WD vehicle.  If you do not rent a 4WD vehicle, many rental car companies do not permit you to drive on F-Roads.  The speed limit on the Ring Road is 90 km/hour outside of cities and towns and 70 km/hr in residential areas.  There are speed cameras, mostly around Reykjavik, and speeding tickets can be costly.

    Speed Camera in Reykjavik

     There are a number of specific rules that you need to remember if you rent a car. Headlights and seat belts must be used at all times while driving. Also, the DUI threshold is half what it is in the United States.

    We used our Garmin, which was one of the few GPS units that includes European maps.  It was very helpful, but having a good map of Iceland is important. It would have been preferable to have brought one with us, but we picked one up at a tourist center early on in our trip.  Because of the complexity of the Icelandic alphabet, we did have some GPS challenges and recommend using GPS coordinates when possible, which is why I have included them here when available.  The GPS/map combo was sufficient for navigating in a country where we were on the same road for most of our journey.  All of our accommodations had wifi, and we never needed to turn on cellular data.

    Icelandic Language

    When we travel to non-English speaking countries, we learn and use basic phrases as often as possible.  As much as I tried, I was not skilled enough to incorporate any Icelandic words into my vocabulary.  Even with a pronunciation guide, we really struggled with all the consonants and extremely long words.  However, the only place we had any trouble communicating was placing an order at a Chinese restaurant in Akureyri.  It was clear that the English was at least the third language of the server taking our order, and even though our boys study Chinese at school, they have not mastered menu ordering.  The food came out fine, but it required some humorous pointing.

    Food

    Food in Iceland is very expensive. While restaurants are usually a big focus of our vacations, we warned our kids that this trip was going to be more about visiting sights rather than enjoying great meals.  We were prepared for outrageous prices in restaurants and groceries and were pleasantly surprised to enjoy a number of great meals at not quite so exorbitant prices.

    Skyr ingredients, including one of the longest Icelandic words we saw

    All of our accommodations had kitchens, and we used them. Our favorite grocery was Bónus.  Some of our favorite items include Hamilisbraud bread, Skinka ham, Maribo cheese, Mjukis ice cream, Nutella and barbecue and paprika chips.  Skyr yogurt is very popular, but was not our preference.  Chicken and produce were particularly expensive, but fish was not, and we enjoyed many meals of amazing seasoned salmon that we baked ourselves.

    From the airport to the Lava Tunnel, we passed Reykjavik’s first Costco, which opened only a few weeks before in May 2017. By the time of our June 2017 visit, one in four Icelandic adults was already a member. We arrived a few minutes before the store opened, and there was a line out the door of people waiting to get in.  The membership line seemed to be never ending.  We heard that the opening of Costco led to lowering of gas prices and produce all over the country.

    The membership line at the popular new Costco

    We picked up a rotisserie chicken, water bottles, apples, Nutella and Ella’s Kitchen squeezies for our toddler. Honestly, the per unit prices for these bulk items were probably comparable to Bónus, but witnessing the Costco mayhem was worth the visit.

    Takeaway is often considerably less than dine in – likely because tipping is not customary. Our favorite was Fish & Chips in Húsavík. Bæjarins Beztu Pylsur is also a wildly famous hot dog stand in Reykjavik that sells only hot dogs and soft drinks and sports a photo of Bill Clinton’s visit in 2004.

    Shopping

    While we often enjoy clothes shopping and finding items not typically available in the US when traveling, Iceland is definitely not the place for clothes shopping due to extremely high prices.  You want to make sure you bring the gear that you might need with you. There are many cute souvenir shops and artists’ studios in Reykjavik, especially near Hallgrímskirkja. Prices are relatively consistent, but if you are looking for a certain item and check out several different shops, you may find slightly different prices.

    We did enjoy a short stop at Kringlan, the country’s largest mall, for some souvenir shopping and just to experience an Icelandic mall.  Our only purchase was from Eymundsson, Iceland’s largest book store chain that also sells souvenirs. We also stopped at the Icewear and 66 North outlets just outside of Reykjavik because we passed them on the way to our Airbnb.  If you want or need to purchase gear, these outlets are the place to do it, but it will be hard to find something comparable to typical US prices.

    While the Keflavik Airport boasts that its duty-free is completely tax-free, we generally found that the cost of souvenirs was higher than in the Reykjavik city center or Kringlan. However, the Airport’s Blue Lagoon shop had the lowest prices offered for Blue Lagoon products – even significantly cheaper than Amazon.

    Money 

    It is not necessary to use cash in Iceland. We literally did not exchange any cash because credit cards were accepted everywhere, even as payment for use of a restroom. My kids were desperate for some Icelandic coins for their international coin collection. Thankfully, a nice clerk at Eymundsson in Kringlan, Iceland’s largest shopping mall, added to our bill and gave us two of each Icelandic coin.

    Continue to Part IV – Reykjavik or check out our listing of all Iceland with kids posts.

  • Planning a Family Trip to Iceland

    Planning a Family Trip to Iceland

    Planning a trip to Iceland requires significant planning.  Some major considerations include timing, flights, accommodation, packing and cell service.

    Timing

    Major considerations when planning what time of year to visit Iceland are average temperature and daily sunlight.  We traveled in June with daytime temperatures typically in the 50s, and we had no concern about snow challenges.  During our visit, the sun set around midnight and rose around 3 am, and the sky was never darker than dusk.  Because it was never dark, there is no chance of seeing Northern Lights, which are only visible from September to mid-April (but dependent on weather conditions).

    View from our guesthouse in Höfn at midnight on the Summer Solstice

    Booking Flights to Iceland

    There are a number of carriers that offer flight deals to Reykjavik.  We flew on one of Wow air’s first direct flights out of Pittsburgh and had a great experience. Wow air and Icelandair also offer free layovers in Iceland to passengers traveling from North America to Europe through Reykjavik and recently announced direct flights to Reykjavik from Cleveland starting in May 2017.

    We did not pay extra for advance seat selection and then worried later that we might have made a mistake and wondered what might happen if we were all placed in middle seats in separate rows.  Luckily, we were able to use online check in as soon as it opened 24 hours before departure and secure five seats in the same row.  We did get a good laugh thinking about how other passengers might react if they found our toddler sitting in the middle seat of their row.

    Iceland Accommodations

    If you are traveling during the June-August high season, you need to book your accommodations very far in advance.  We started making arrangements five months before our trip, which was completely unheard of for us, but we found accommodation options – particularly around Vík and Höfn – extremely limited and had to spend two nights in rooms of guesthouses with shared kitchens/baths.  We spent the other eight nights in our own apartments.

    Traditional hotels are not so common in Iceland and often very expensive.   We actually did not stay in any hotels.  All accommodations we stayed in were extremely clean and included kitchens, something not commonly available in typical US hotels.  Due to the exorbitant cost of food, we regularly prepared our own meals.

    However, our accommodations did not usually include amenities common in US hotels like soap, shower gel, shampoo, conditioner or a hair dryer, and none had an iron.  I made sure when booking that we had access to a washing machine every few nights and would definitely recommend that. Also, there wasn’t a “front desk” at any of our accommodations.  It was necessary to make plans in advance to meet the host for the key.  Our key was once left in a lockbox outside of the apartment and another time under a flower pot.

    We were able to book Airbnb apartments in both Reykjavik and Akureyri but did not find availability in less populated areas of the country.  These were our first Airbnb experiences, and we enjoyed having our own apartments.  The kids particularly enjoyed bunk beds in our Akureyri accommodation and the large sectional in Reykjavik.

    Akureyri AirBNB
    Reykjavik AirBNB

    We booked accommodations in guesthouses and apartments for the rest of the trip through booking.com. Booking.com was especially helpful because you can search for accommodations suitable for two adults and three children, even though we took advantage of our daughter’s preference to co-sleep when all we could locate was accommodation for four. The amenity descriptions and reviews are very detailed, so you know exactly what to expect.

    Iceland Car Rental

    Car rental is almost always the most affordable transportation option for families visiting Iceland, even if you are visiting only Reykjavik.  There are lots of day tour options from Reykjavik, but the cost of those tours would well exceed the cost of a daily car rental for a family, not to mention travel from the airport to city centre. If you are planning to travel the Ring Road with children and not taking an organized tour, car rental is essential.  Also, if you rent your own car, you have much more flexibility than you would on a tour, and that is key when traveling with kids.  Cars are driven on the right side of the road like in the US.  While the Ring Road is paved, not all roads in Iceland are paved or even well-maintained.  Rental companies permit only 4×4 vehicles to be driven on the F-roads, which are certain gravel roads that are not clearly marked.  So, rental of a 4×4 for a Ring Road trip is important.  Car rental companies include Northbound, Lagoon, Lotus, Go Car Rental, RAS, Thrifty and Geysir. We rented a Suburu Forrester from Geysir at the Keflavik Airport.  A shuttle took us from the airport to the Geysir office, which had a kids’ play area and a free coffee/hot chocolate machine.

    WOW air permits a free stroller or a car seat for each child under seven.  Because we were not bringing a stroller, we did bring a convertible car seat for our daughter. We knew there was a chance that our LATCH system convertible car seat might not work with ISOFIX, and most cars in Iceland do not have self-locking belts.  We brought installation instructions for the seat and safety clips but were pleased that the seat installed perfectly with ISOFIX.  For each of our boys, we brought an inflatable BubbleBum Travel Booster Seat. These fit into our suitcase easily but needed to be re-inflated frequently.

    Note that seat belts are required for all passengers at all times, and headlights should always be turned on while driving.  Also, the DUI limit is half of what it is in the US.  You must always be prepared for sheep, cows horses and reindeer straying into or crossing the road.  Drivers who injure animals may be liable for compensation.

    We had heard that rental companies in Iceland inspect their cars very carefully, and renters are cited for damage more often than in the US. Most rental car damage in Iceland occurs as a result of wind – usually car doors flying open with more force than expected and hitting something.  The car we rented had some exterior damage that was noted in our rental papers.  However, in the middle of the trip, we could not remember the exact extent of the damage and wondered if we would be cited.  Next time, we will definitely take pictures of the car before leaving the rental company parking lot.  Our Costco Visa that we used to book our rental car provided additional rental car insurance, but we were fortunate not to need it.

    Our rental Suburu Forrester

    Packing

    Packing for potentially very cold, wet and windy weather has challenges.  See our detailed Iceland packing post.  It is essential to bring layers and good rain gear.  The best packing advice I received was to bring rain pants.  None of us had ever owned rain pants, and I was a bit skeptical about whether or not they were really necessary when I purchased a pair for each of us.  I left the tags on to return if they ended up not being needed.  However, we discovered in the first few hours that they were definitely necessary and served as great protection from both the rain and the wind.

    On cold/wet days, we wore hats, gloves, base layers, shirts, fleeces, rain jacket and rain pants. Waterproof hiking boots are highly recommended, but we did not all have them and still managed fine.  We each brought a two pairs of sturdy shoes but found that we only needed one pair 90+% of the time. On warmer and sunnier days, a long-sleeved shirt and pants could sometimes be sufficient, but we generally needed to have a light jacket available.

    It is important to check airline size and weight baggage allowances. WOW air allows each passenger to carry a personal item (e.g. a small backpack) on board free of charge. However, regular sized carry-ons luggage and checked bags require additional fees, which often raise if you add after booking or check in.

    When we booked our flight, we added one checked suitcase for our whole family to share. I worried later that we would not have enough space for all of our coats, gear, pool towels and car seats, but because we chose the items we brought carefully for versatility and planned do to laundry every few days, it turned out to be sufficient.  We packed most of our clothes in our individual backpacks that we carried as our free personal items.  This method kept our clothes separate and organized.  We packed all the gear and large items in the suitcase, which almost exactly hit WOW air’s size and weight limits.  If I went back, I would definitely be even more efficient in terms of packing.  The most notable items that we did not need were flip-flops (it was too cold to wear them outside, and they were not permitted at pools), pool cover-up and extra outfits.

    I found that we definitely had more changes of clothes than we need.  We were wearing jackets in almost all of our pictures so you cannot even identify our shirts.  Our rain gear protected also protected our clothes, so they did not really get wet or dirty.  So, a variety was definitely not needed.

    When we wore our rain gear, the clothes underneath really did not get wet, even during the rain (except for the time my son fell into the ocean at Reynisfjara Beach). I found that we had more changes of clothes than necessary and did not really need flip flops and bathing suit covers, which we used only at the Blue Lagoon and not at any of the other pools.

    Iceland Cell Service

    We researched relatively inexpensive options to add voice/data in Iceland but ended up not using cell service during our trip. We were able to unplug during the day and use WiFi at our accommodation in the evenings.  While most guest house/AirBNB hosts assumed we would have phone service to call them when we arrived, we were able to arrange in advance to get WiFi passwords to contact our host on arrival if they were not already on site.

    In addition to usual preparation, there are unique logistical considerations after arriving in Iceland with kids, including driving concerns, the Icelandic language, food and shopping challenges and money exchange.  We enjoyed planning a family trip to Iceland.

    Continue to Part III – Logistics or check out our listing of all Iceland posts.